In This Post:
- Benefits of Using a Wall
- Balancing Posture Benefits
- Inversion Benefits
- Restorative Benefits
- You Should Be Using a Wall for THESE 10 Yoga Poses
- Balancing Poses
- Warrior II (Virabhadrasana II)
- Warrior III (Virabhadrasana III)
- Half Moon Pose (Ardha Chandrasana)
- Standing Splits
- Inversions
- Forearm Balance (Pincha Mayurasana)
- Wide-legged Standing Forward Fold (Prasarita Padottanasana)
- Restorative
- Wide-legged Seated Forward Fold (Upavistha Konasana)
- Reclined Bound Angle (Supta Baddha Konasana)
- Reclined Side Splits
- Legs Up the Wall (Viparita Karani)
- Balancing Poses
- Conclusion
In last month’s blog post, I talked about my favourite at-home props for your home yoga practice. One of these is the humble wall: from Ashtanga inversions to vinyasa balancing poses to restorative reclined postures, a wall can enhance your asana regardless of the yoga style you practice. This post explains some of the benefits of implementing a wall in your practice, followed by a breakdown of 10 poses that pair wonderfully with a wall!
Benefits of Using a Wall
The benefits of using a wall for your yoga practice range widely and are largely dependent on the type of poses for which you are utilizing the wall. Poses against a wall can generally be categorized as balancing postures, inversions, and restorative poses.
Balancing Posture Benefits
- Provides support and stability to make balancing more accessible to a wider population
- Helps with finding proper alignment – especially in creating a long, straight spine when your back is pressed against the wall (think warrior II)
- Provides a reminder to keep certain body parts active (i.e., flexing the back foot in warrior III)
Inversion Benefits
- Provides stability and balance
- Provides more safety and greater security for students who are learning inversions
- Makes inversions accessible to students who are not ready to practice in the middle of a room
- Offers variations of inversions that are difficult or awkward without a wall (i.e., headstand with the knees bent and soles of feet pressing into the wall)
Restorative Benefits
- Enhances comfort when holding postures for a long time
- Ensures the body is supported – a must in order to be at ease and relaxed during a restorative practice!
- Provides additional variations of postures (i.e., reclined bound angle with the feet against the wall is a wonderful alternative for students who find this pose uncomfortable with the feet and legs on the floor)
- Helps students work toward full expressions of postures (i.e., wide-legged seated forward fold with one foot against the wall is a beneficial practice for students whose goal is to achieve full wide-legged seated forward fold)
You Should Be Using a Wall for THESE 10 Yoga Poses
Now that we’ve covered the benefits, let’s talk about 10 poses that can be enhanced by using a wall!
Balancing Poses
Warrior II (Virabhadrasana II)
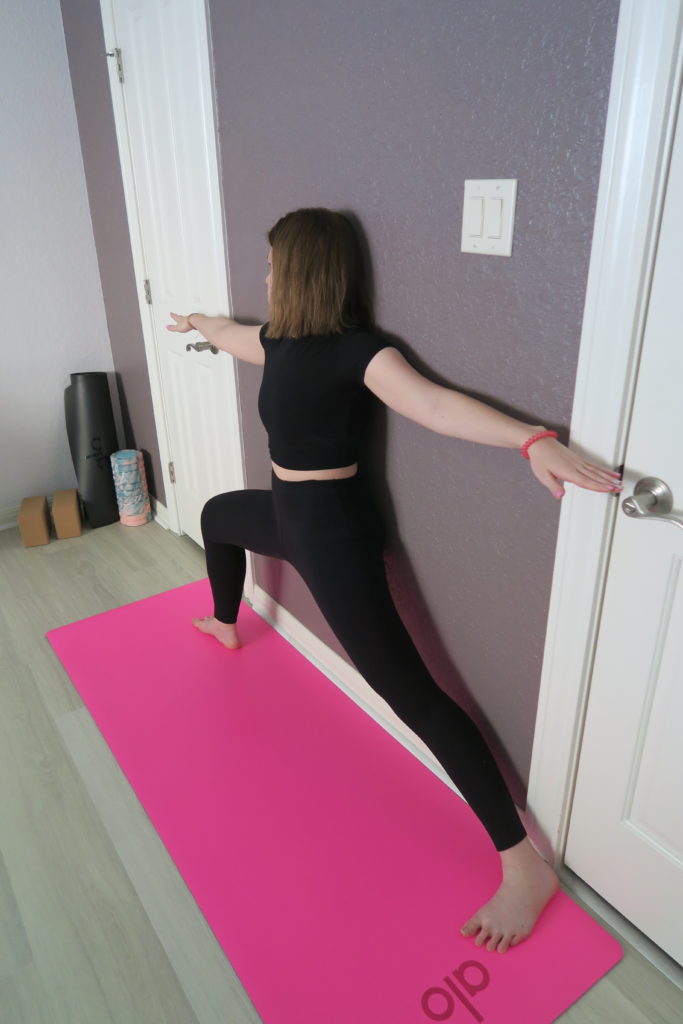
Practicing warrior II against a wall enhances stability, encourages length in the spine, and helps students find external rotation in the hips and an opening in the chest. For students seeking to deepen their expression of this posture, a wall provides added balance as you increase the bend in the front knee.
To practice warrior II against a wall:
- Shoulders and triceps should press into the wall
- Glutes and the majority of the back body should be in contact with the wall
- Front foot placement: the front foot should either bisect the back arch, or the front heel should be aligned with the back heel
- Open the chest toward the long edge of your mat while both shoulders remain in contact with the wall
- Find external rotation in the hips (hips open toward the long edge of the mat) by keeping both glutes in contact with the wall
- Energetically spin the front thigh toward the wall (knee stacks over ankle) and the back thigh in and down toward the front heel
- Gaze forward, find energy out the fingertips, and draw the shoulders down and away from the ears as normal
Warrior III (Virabhadrasana III)
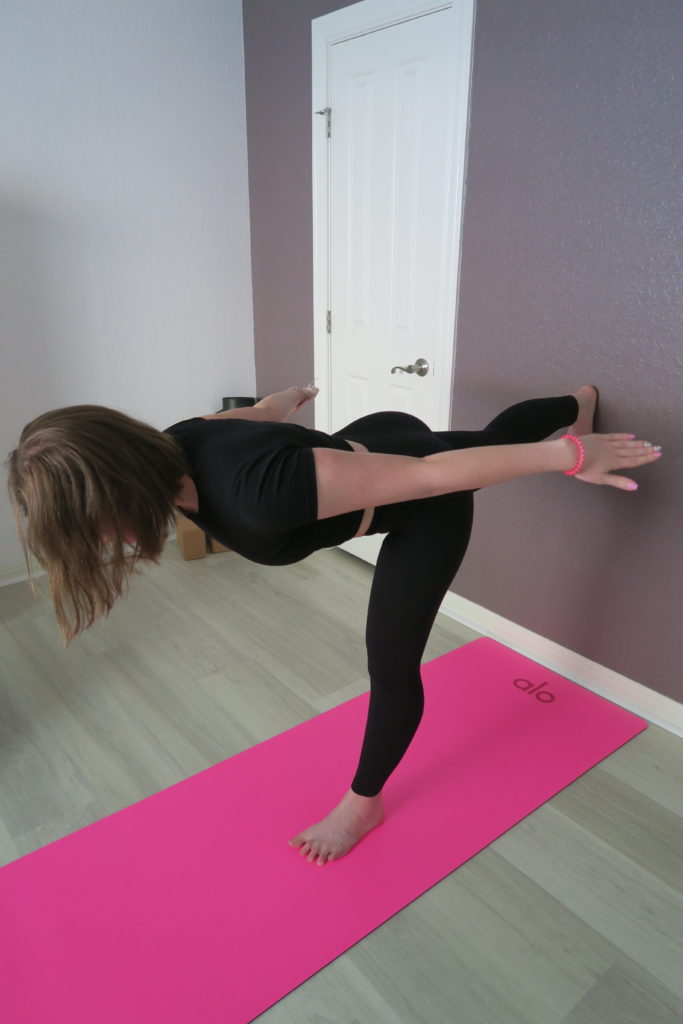
Warrior III is challenging because the hip of the free leg has a tendency to rise up toward the ceiling, but it should actually be dropped in line with the standing hip. Using a wall for the free foot upgrades your stability, which will help with spinning the back toes down, dropping the free hip, and finding proper warrior III alignment.
To practice warrior III using a wall:
- Stand one leg’s distance from the wall, facing away from the wall (you can approximate this distance by coming to sit with the soles of your feet pressing into the wall, then stand where your hips were when seated – adjust as needed by trial and error)
- Tip into warrior III (here is where you may need to adjust standing foot placement)
- Flex the back foot and actively press the sole of the foot into the wall, spinning the toes down to face the ground
- Drop the hip of your free leg more than you think you need to in order to bring it in line with the standing hip
- Engage the core as you lean forward with your upper body, gaze slightly forward
- Microbend the knee of the standing leg to avoid hyperextension
- Create one long line of energy from the heel of the back leg through the crown of your head (the intention is to have the head, hips, and back heel on an even line, so none is higher or lower than the other)
Half Moon Pose (Ardha Chandrasana)
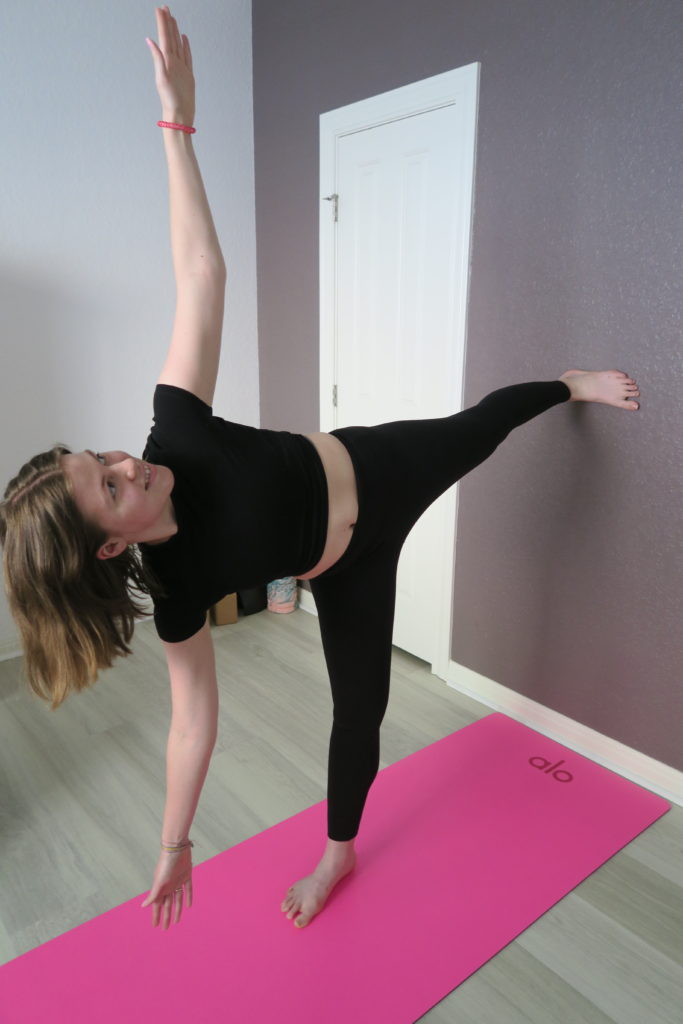
Half moon is a classic wall pose because of how much balance the wall provides, allowing students to stack the hips and open toward the side of the room.
To practice half moon against a wall:
- Using the method as described for warrior III, stand one leg’s distance way from the wall. Face away from the wall.
- Bring the hands to blocks or the floor and slide the back foot into a warrior III position on the wall – then spin the toes out 90 degrees to face the long edge of your mat.
- Microbend the knee of the standing leg
- Flex the free foot and actively press it into the wall
- Send the fingers (of the hand corresponding to your raised leg) up toward the sky. Engage the core as you open your chest toward the long edge of the mat.
- Find external rotation by stacking the hips
- Bottom hand can be free or pressing actively into a block on the highest height
- Arms should be in one straight line – be aware of the top arm moving too far back in space!
- Create one long line of energy from the heel of the raised foot through the crown of the head. As in warrior III, the intention is to keep the head, hips, and back foot in an even line so none is higher or lower than the other.
Standing Splits
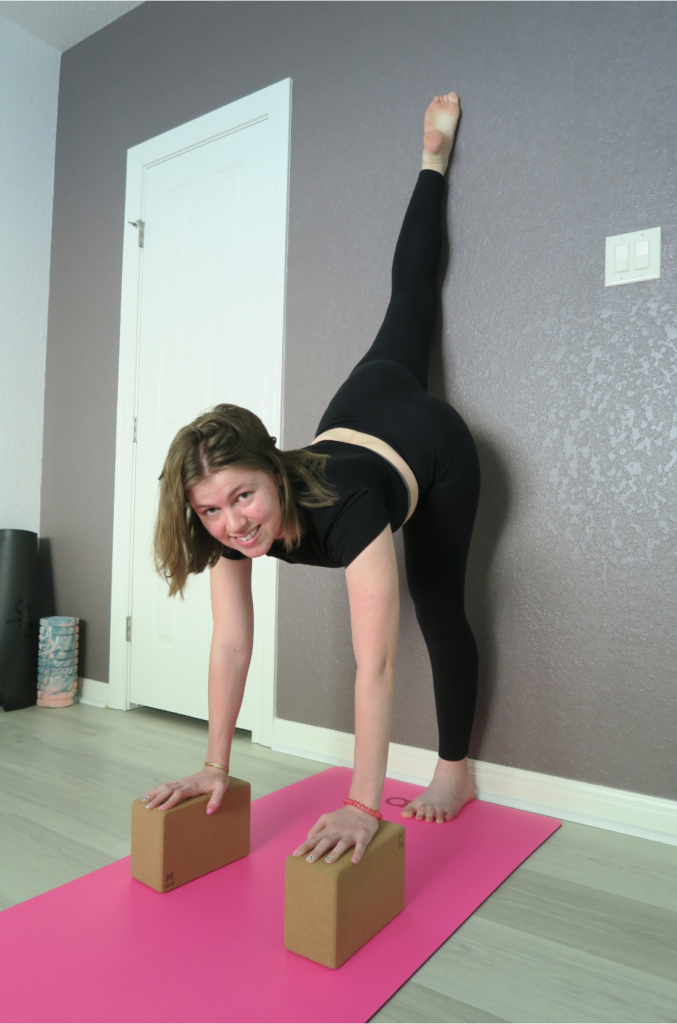
Standing splits against a wall is great prep for both regular standing splits away from the wall and for splits on the ground! I highly recommend having two blocks to press your hands into for this pose, as reaching all the way for the ground can take you out of the splits and is potentially more destabilizing. One note: you will have to use trial and error to find where placement of your standing foot feels best. I recommend starting with the heel 6-12 inches away from the wall, and moving further away from or closer to the wall as best suits your body.
To practice standing splits against a wall:
- Hands should be anchored on blocks (preferable) or the floor
- After you have found the correct placement for your standing foot, bend the knee of your free leg and do half of a hip circle (like you would in tabletop or downward-facing dog) to bring the front of the thigh against the wall – straighten the knee
- Microbend the knee of the your standing leg
- Actively press AWAY from the floor or the blocks, whichever your hands are pressing into
- Draw the shoulders back (toward the wall) and away from the ears
- Square the hips toward the floor (both hip points face the ground instead of opening toward the side of the room)
- Press the knee, shin, and top of your free foot into the wall
Inversions
Forearm Balance (Pincha Mayurasana)
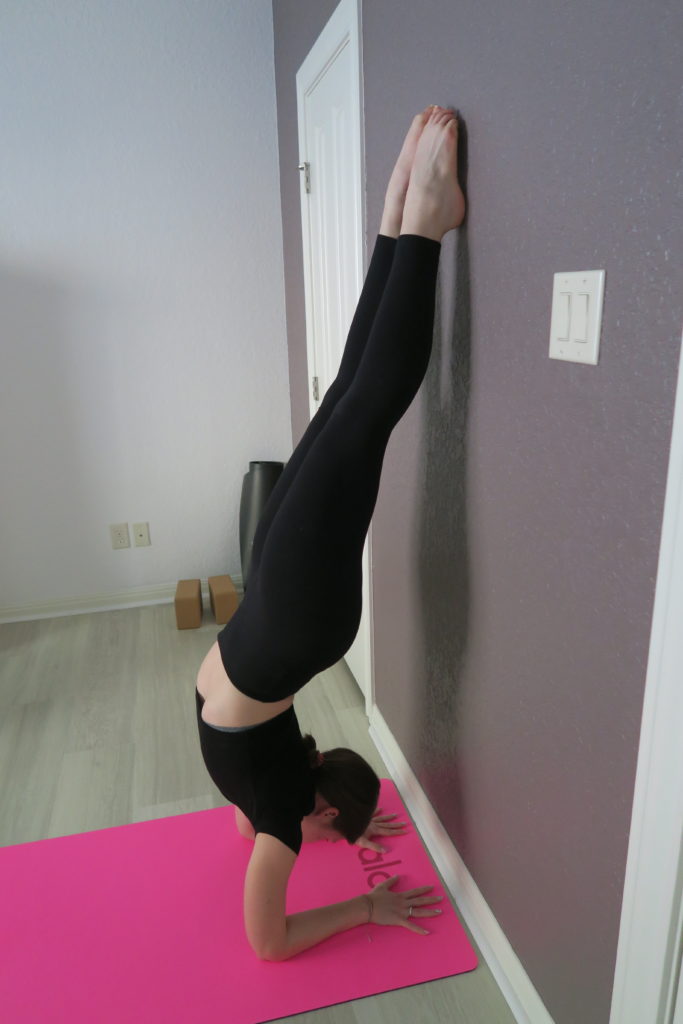
Practicing forearm balance against a wall is ideal because as you feel more comfortable, you can begin to float the feet a few inches away from the wall. One caveat: forearm balance (pictured) is unique in that extreme arching of the back is allowed because 1) we are looking forward between the hands; and 2) this shape is necessary to practice scorpion and other variations of pincha mayurasana. If practicing headstand and handstand, find as straight of a spine as possible through core engagement – be careful not to overarch in the back when you let your feet rest on the wall!
To practice forearm balance using a wall:
- Grasp opposite elbows to find correct elbow placement on your mat (elbows are shoulder-width apart)
- Plant the palms straight in line with the elbows, fingertips about 2 cm away from the wall. Spread the fingers wide and press actively into all 10 fingertips.
- From dolphin pose, walk the feet toward your arms and enter your forearm balance when ready (Note: while swinging/kicking up into forearm balance and handstand is acceptable, you should NEVER enter headstand in this manner. Headstand should only be practiced if you have sufficient core strength to raise up without swinging or kicking into the pose).
- Press out of your shoulders actively (as if you were trying to rise toward the ceiling)
- Gaze between the fingers
- Engage the core
- Point the feet and hug muscle to bone in the legs as you stabilize in this position
Wide-legged Standing Forward Fold (Prasarita Padottanasana)
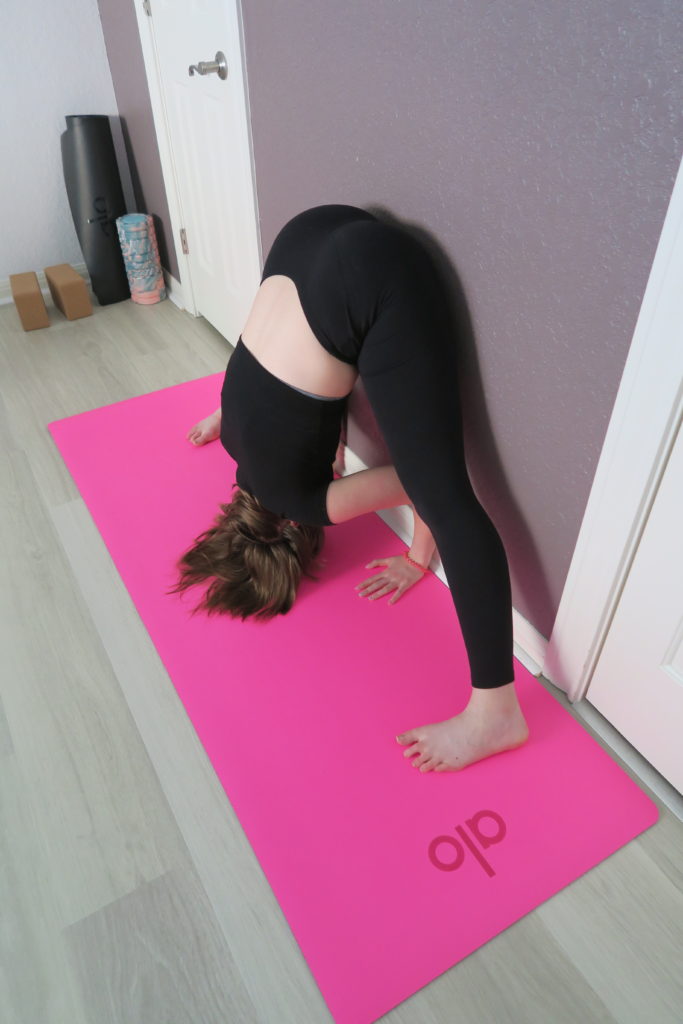
The benefits of using a wall for wide-legged standing forward fold are twofold (pun intended): 1) the wall upgrades the restorative nature of this pose by providing support; and 2) a wall helps with sending the weight into the balls of the feet by bringing the hips in line with the feet, rather than having the hips back in space from the feet (which can lead to “hanging” in the tendons and ligaments with no muscular engagement to protect these soft tissues).
To practice wide-legged standing forward fold with a wall:
- Stand with your glutes, back, and shoulders against the wall, feet wider than hip-width apart (heels may be flush with the wall or a couple inches away from the wall, depending on your anatomy and personal comfort)
- Pigeon-toe the feet so the heels point out slightly, toes pointing in slightly
- Fold forward, hinging from the hips rather than rounding in the spine. Hands may rest on blocks or the floor, or bring the crown of the head to the floor (if taking this variation, walk the palms back in line with the arches of the feet, elbows and forearms pressing into the wall and arms in a chaturanga position with a 90-degree bend in the elbows). Alternatively, take any variation of this fold that feels best to you (holding the ankles or big toes, a twist, or any other shape).
- Glutes and hamstrings press into the wall. The purpose of the wall is to prevent the hips from moving back in space (behind the heels), which commonly occurs when this pose is practiced in the middle of a room. To further ensure proper alignment, actively shift your weight into the balls of the feet, which will bring the hips in line with the heels.
Restorative
Wide-legged Seated Forward Fold (Upavistha Konasana)

Working toward full expression of a wide-legged seated forward fold can be disheartening because of the competitive quality this pose often takes on in a large class. But it doesn’t have to be: I work with my privates extensively using the wall to navigate successfully towards upavistha konansana via a pose I call “90-degree legs.” Using a wall also provides support for a foot (or both feet, in case you have two available walls – such as in the corner of a room), making this forward fold much more restorative (remember the cardinal rule of restorative poses – the body must be supported!).
To practice wide-legged seated forward fold using a wall:
- Press the sole of one foot (or both feet, if in the corner of a room) into a wall, sitting with the legs in a 90-degree angle at the hips and groin. All 10 toes point up toward the ceiling.
- Find length in the spine and sit up tall (elevate the hips using a folded blanket or other prop if the spine is rounding)
- Inhale grow tall, and exhale to fold forward
- As you practice this “90-degree legs” posture regularly, you will find more space and ease. Over time, begin to bring the free foot (the one not pressing to the wall) out to the side little by little, opening the hips into an angle greater than 90 degrees. Once comfortable in this variation, there is the option to work toward the fold by elevating the hips if desired, growing tall through the spine, and then folding forward. Throughout this process, ensure that all 10 toes remain pointed up to the ceiling – they have a tendency to begin pointing toward the back or the front of the room in deeper variations of this posture.
Reclined Bound Angle (Supta Baddha Konasana)
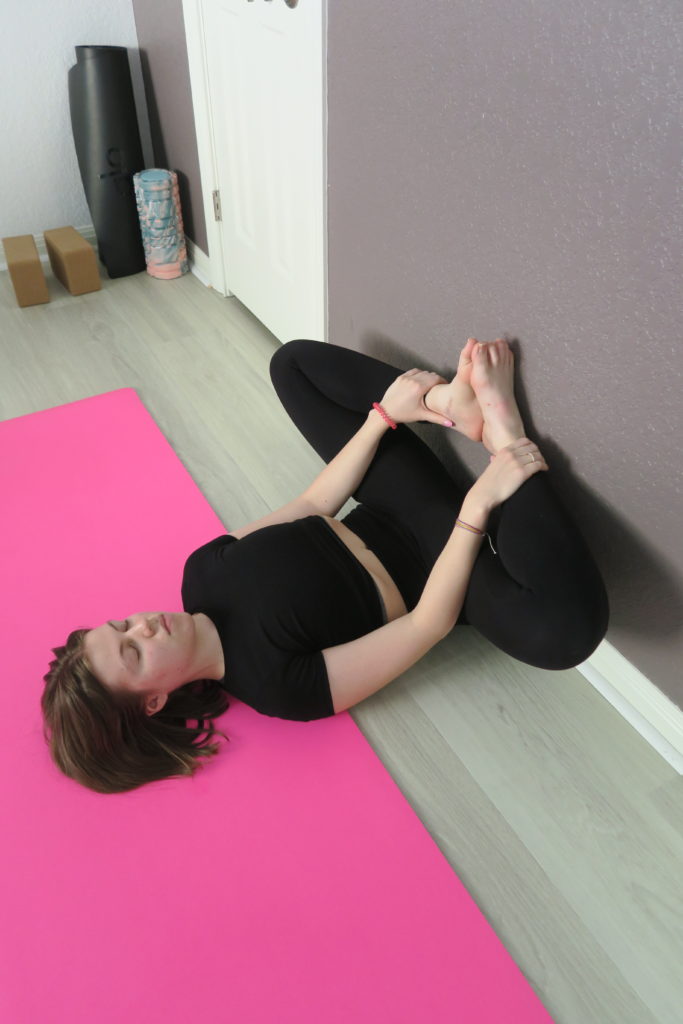
Some students find traditional supta baddha konasana uncomfortable because the feet and legs are resting on the ground, which can create strain and tension in the hips and low back rather than releasing these areas. A wall offers a unique variation of this pose, minus the strain and discomfort you may experience in the traditional version.
To practice reclined bound angle using a wall:
- Sit with one side of your body against the wall, side of the hip very close or flush to the wall
- Lie down on your back and swing the legs up. Scoot the hips closer to or farther from the wall as needed.
- Bend the knees and bring the soles of the feet to touch, sinking the heels down toward the groin. The closer the heels are to the groin, the deeper the stretch.
- Hold the ankles or find another comfortable arm variation.
- Option to bring a block under each thigh for additional support of the legs (this feels especially nice if holding as a restorative posture for a considerable length of time!)
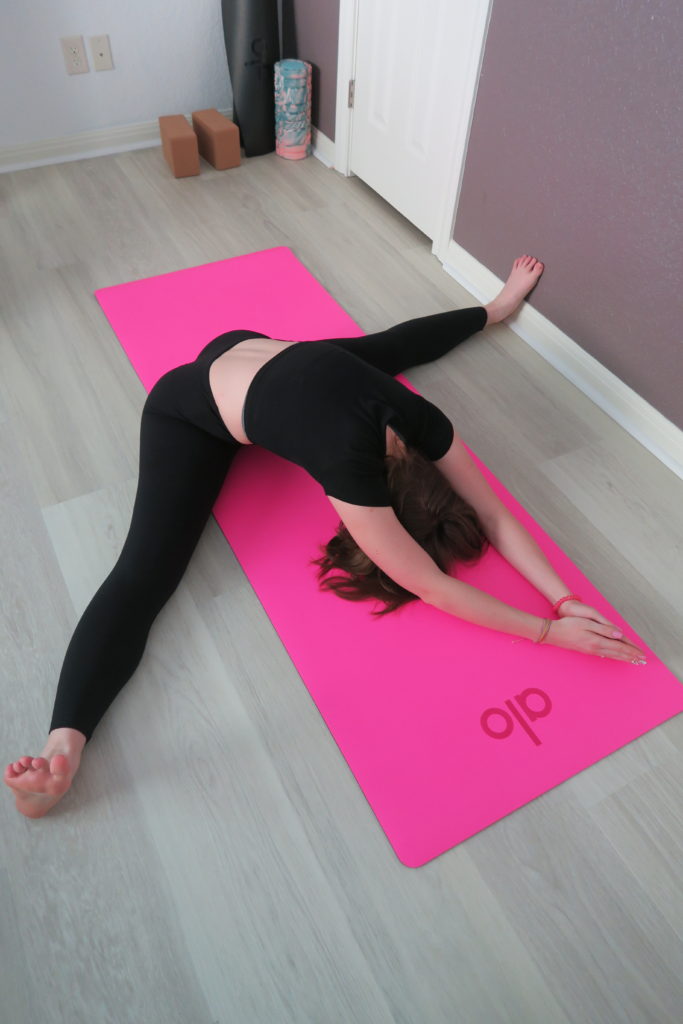
Reclined Side Splits
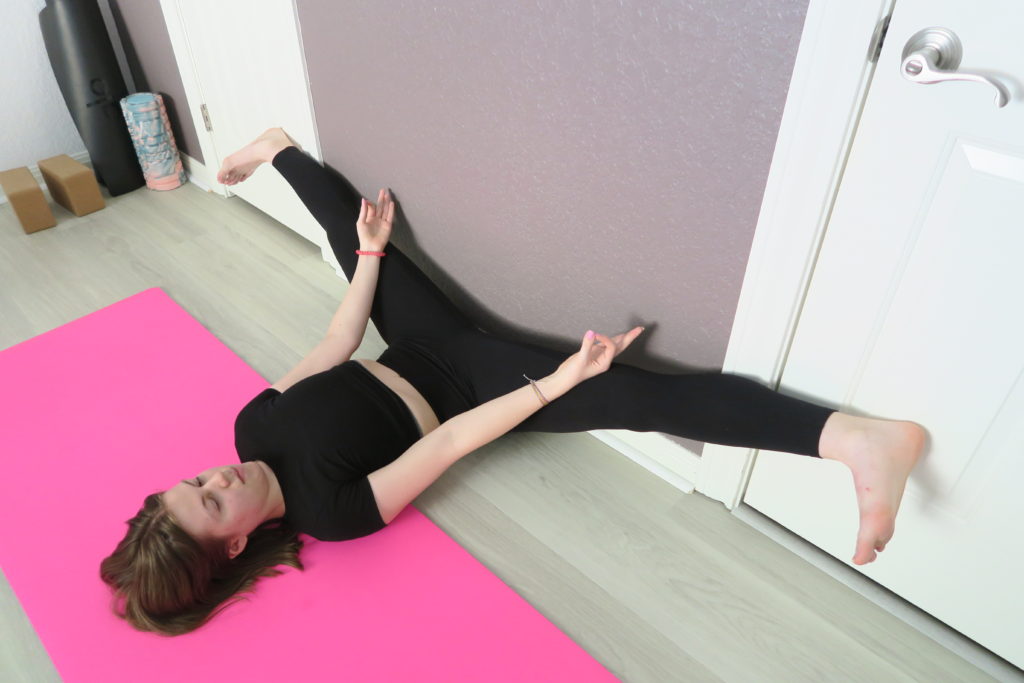
Reclined side splits against a wall is a wonderful prep posture for traditional side splits on the ground. While frog pose is generally used as side splits prep, this wall posture removes the force of gravity (in contrast to frog, where gravity is pulling your body weight down), meaning it is much safer for the knees and less stressful on the body, which reduces the risk of tearing or pulling soft tissue or muscle.
To practice reclined side splits against a wall:
- As described for the previous pose, lie down and swing your legs up against the wall, moving the hips closer to or farther away from the wall as desired.
- Flex the feet (toes back toward your face) and send the feet away from one another, sinking each foot toward the ground
- Rest the hands on the ground, belly, or inner thighs, or choose another arm variation that feels comfortable. Do NOT use the hands to press the legs closer to the ground.
Legs Up the Wall (Viparita Karani)
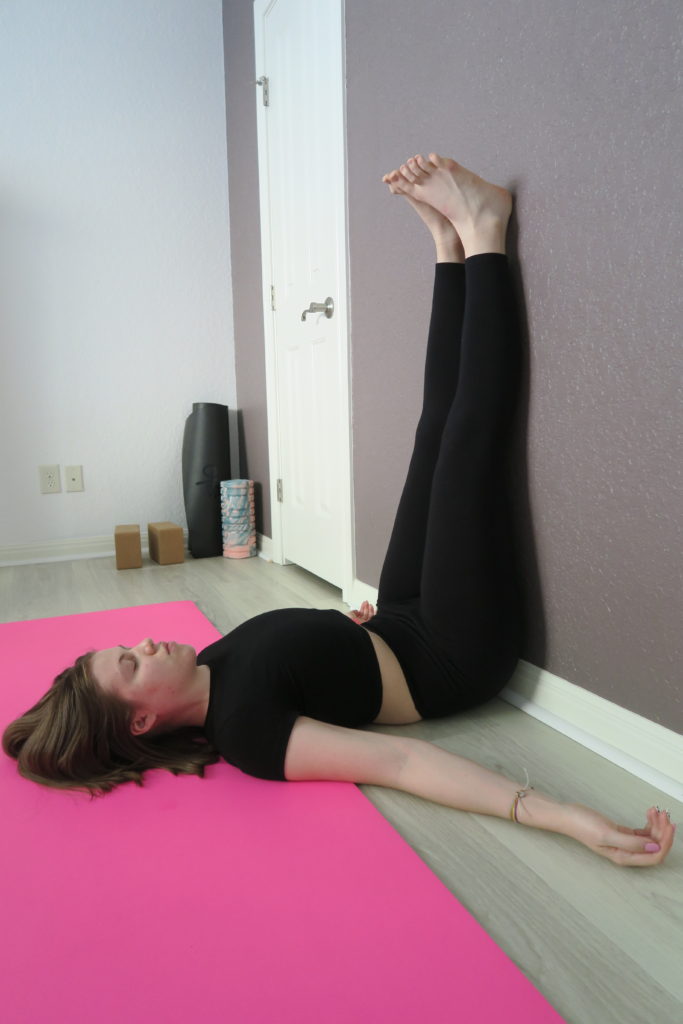
Legs up the wall is a classic restorative posture frequently practiced at the end of class, often with students in the middle of the room and using an imaginary wall. While this is very nice, it never feels as supportive and restorative as having a real wall to rest the legs against in order to fully release and let go.
To practice legs up the wall against a wall:
- Come to lie with your back on the floor and legs up the wall using the method described for the previous two postures.
- Rest the hands on the ground, belly, heart and belly, hip creases, or in another comfortable arm variation.
- Option to pull the toes back toward your face softly, let the feet relax fully, or part the heels slightly and let the toes fall together.
Conclusion
Using a wall for your yoga practice can add stability in balancing postures, make inversions safer and more accessible, and provide the support needed to fully release in restorative postures. Whether you are looking to find more support, deepen a stretch, or add stability to a balancing pose, a wall can meet all of these needs and more. While the 10 poses demonstrated against a wall here are a great start, there are many more to discover! Get creative during your yoga practice to see how a wall may best serve YOU and the postures you practice.