Tadasana, or ‘mountain pose’, is your home base pose in a yoga practice: it’s often the first standing pose in a class, and it serves as a recentering place you can come back to at the end of each flow.
Tadasana is often underestimated because it looks like you’re just standing. In reality, it is an extraordinarily demanding pose because every muscle of your body is engaged and working to hold you in proper alignment.
So, what is proper alignment for tadasana?
Even if you’ve never considered how alignment relates to mountain pose, by the time you have finished this post you will know all the ins and outs of alignment in tadasana!
Note: As always, the alignment guidance provided in this post is general advice and should not be considered the end-all, be-all of the pose. Listening to your body comes first and foremost — the pose is not the goal, and how it feels is more important than how it looks. Make adjustments as necessary to meet your body where it is, rather than forcing your body to meet the pose!

Tadasana Alignment
Lower Body
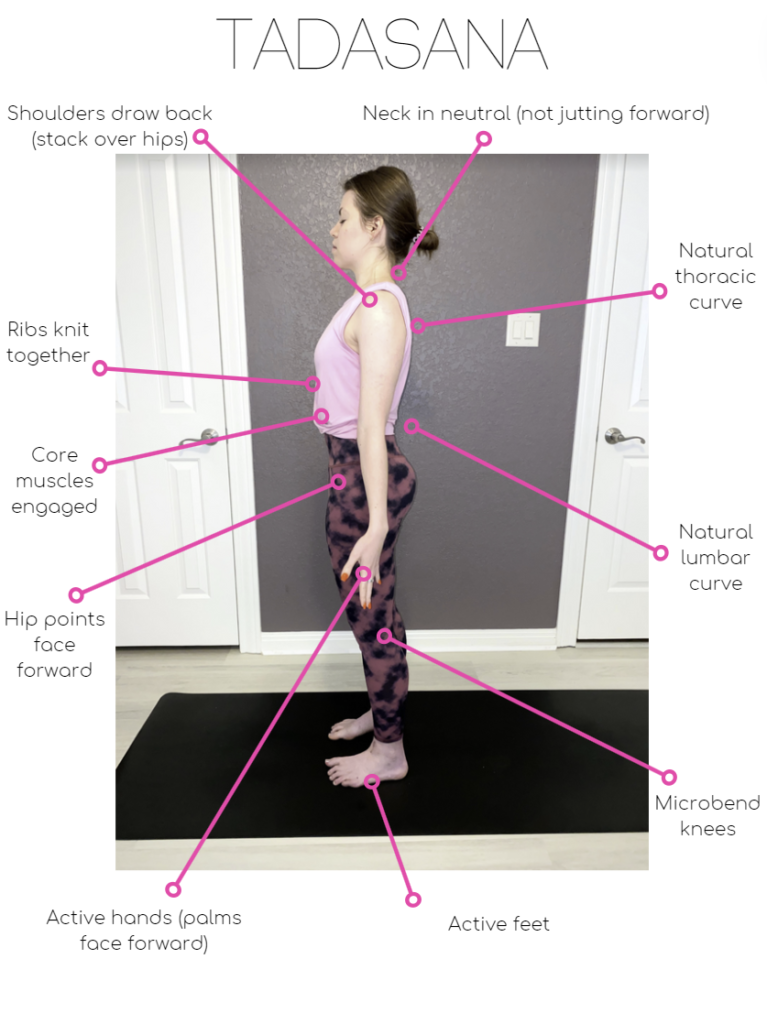
- Foot placement: The feet are the foundation of your tadasana, so this is where you should always begin refining your alignment (also, making adjustments to foot placement can affect your entire alignment, so work from the ground up when adjusting!). Feet should be hip-width apart or flush together. Most importantly, all 10 toes should point forward and the heel should be behind the middle of the widest part of your foot.
- Active feet: Actively press your weight into all four corners of each sole (left corner of heel, right corner of heel, pinky toe, big toe). Weight should be distributed evenly between all four corners of each foot (i.e., not solely in the heels or solely in the toes).
- Active legs: The glutes and thighs should be engaged and active in tadasana. To engage these muscles, imagine hugging muscle to bone, firming the thighs, and slightly squeezing the glute muscles.
- Microbend the knees: Engaging the leg and glute muscles has a tendency to cause the knees to lock in a hyperextended position. This hyperextension is undesirable because we then ‘hang’ in the joints with no muscular engagement in the muscles surrounding those joints. To prevent this from happening in tadasana, microbend the knees ever so slightly.
- Hip points: The bony hip points should face forward, toward the top of your mat. To find length in the spine, you can imagine the hip points as headlights that are shining up toward the ceiling (this encourages a scooping of the pelvis forward and lengthening of the tailbone toward the heels — all of which will help avoid overarching the lumbar spine).
Upper Body
- Natural lumbar curve: The lumbar (lower) spine is behind your abdominals and between the thoracic spine and tailbone. Opposite to the thoracic, this lumbar region has a slight natural ‘arching’ that does not need correcting. However, core should remain very engaged and active while in tadasana to avoid overarching of the lumbar.
- Natural thoracic curve: The thoracic (upper) spine is behind your heart and rib cage. This region of the spine has a slight natural ’rounding’ that does not need correcting.
- Ribs knit together and engage core muscles: There is a tendency to splay the ribs open, disengage the core muscles, and overarch the lower back when we stand up tall and draw the shoulders back. To counter this, knit your front ribs together (imagine wearing a corset), engage the abdominals, and lengthen the tailbone toward the heels (think of “scooping” the pelvis slightly forward in space).
- Shoulders draw back: Many bodies will be accustomed to rounding the shoulders up and forward habitually, so actively draw the shoulders down and back. Think about finding a chest-opening (shine the heart forward) as the shoulders stack over the hips. Shoulder blades should actively draw together and down the backbody.
- Active hands: The entire arms, from shoulders to fingertips, are active in tadasana! We already discussed shoulders. For the arms, biceps and inner elbow creases should rotate to face forward. Palms of the hands face forward and hands are actively engaged (fingertips spread wide).
- Neck in neutral: Avoid jutting the chin forward or pulling it excessively back in space. The neck should have a very slight arched curve (this is the natural curve of the neck) that mimics the arch in the lumbar spine (just a much smaller arch). Chin should be parallel to the floor to avoid rounding or crunching the neck by having the chin too high or low. Most of us will need to draw the chin slightly back in space, since we habitually spend a lot of time with the chin jutting forward and the head forward of shoulders (think text neck).
As you can see, tadasana is deceiving because it looks like simply standing (easy enough!), yet every muscle in the body is engaged and working to hold you in alignment. It’s a very physically demanding pose, so if you find tadasana challenging to hold you are not alone. Keep practicing and it will get easier with time as the muscles become accustomed to supporting this standing posture. Having someone take photos of you in tadasana is SO helpful for analyzing your own body and making adjustments. Also, ask your yoga teacher for additional instruction on mountain pose after class if you are unsure about your alignment – teachers love to help students with this pose because it is the foundation for all other yoga poses!

